The Making of VX1: Exporting
This is part 5 in the process of The Making of VX1
Once editing is completed, I format and export the session into a structure that I can send off for mixing. It is important to be exacting during this process. It’s all very easy stuff, but we can waste a lot of time and money if we force our mixing engineer to fix weird format issues instead of focusing on the music. Sorting, re-ordering, and re-naming 100+ tracks is NOT what a mixing engineer wants to be working on.
The Anatomy of a VX1 Session Export
The format of an exported session will vary depending on the expectations of whoever is mixing the album. For example, Bill has his own set of expectations, which he describes on his website FAQ. Since every session has unique ideas, an album will often not line up 100% with any expectations. So usually it takes a little time for the musician and engineer to get on the same page. My first song with Bill took a bit longer, as we discovered a methodology that works best for us.
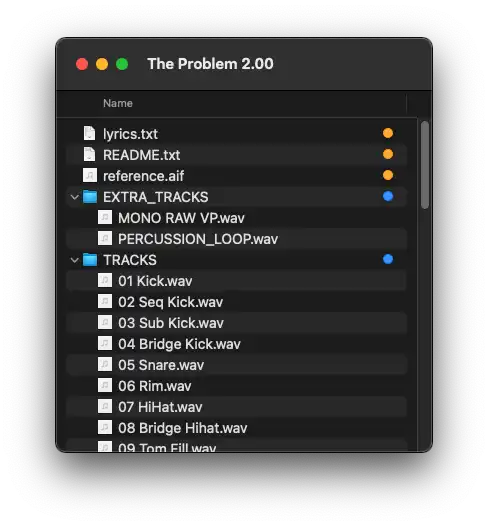
Generally, the way I have files setup in a session looks something like this:
A quick summary:
README.txt: Description of important notes. Always includes key and tempoLYRICS.txt: Lyrics of the songREFERENCE.wav: My rough mix of the songSCORE.pdf: Not really applicable to VX1 (since alot of this album was arranged off-paper). Normally, I would have included a score and a multi-track.midifile for reference. |TRACKS: A folder that has .wav files of all the session audio, ordered by numberEXTRA_TRACKS: Tracks that I don’t think will actually be used, but could possibly be useful (for instance raw versions of tracks I added effects to, or the full percussion takes) |
REFERENCE.wav #
This is basically just a quick mix that I created, using basic effects. This is ALWAYS in-line time-wise with the tracks I’m sending. I expect it to be put in the same session alongside the tracks, so the mix engineer can listen to it if they want an idea of what I was hearing. I also reference this track in README.txt when I am writing notes.
Here is the reference mix for Charlatan Days:
README.txt
Gives contextual information about the song, and notes about what I’m looking for. Basically, it’s a map for the session. It includes:
- Tempo + description of tempo changes
- General description of song
- Description each track/part group
- Including descriptions of effects I already applied, and where to find the RAW versions of those takes.
- Line Notes explaining important points
- These include a timestamp AND measure number that refer to
REFERENCE.wav.
- These include a timestamp AND measure number that refer to
I usually also copypasta this into my e-mail thread with Bill, and format the text, so he could refer to it that way.
Here is the README.txt for Charlatan Days:
TEMPO: 172 bpm

TRACK NOTES:
  - `13 Overheads` I've been layering reference loop on top to make things feel more natural.  Most of other vp is drum machine
  - `24 Dmm Bass 8vb` is `25 Dmm Bass` Left Channel pitched 8vb
  - `27-32 Intro Harmony/Lead` the second iteration (m113) has no cuts or pitch edits.  There's a cuts-only version in EXTRA TRACKS
  - `53-55 Chorus 1 Harmony 8vb` is `56-58 Chorus 1 Harmony` pitched 8vb just to fill out that freq range.
  - `76 Verse 2 High Arp 8va` is `75 Verse 2 High Arp` pitched 8va + messing with formant stuff

EXTRA TRACKS (numbered as I'd place in TRACKS):
  - 27-32 RAW Intro Harmony/Lead
  - 32.1-32.5 Alternate Intro Lead
        - (mono, more mids, slightly different cuts, the tracks used in my reference-mix)
  - 33-41 Rhythm Pad w/o gate
  - 41.5  ^ gate is driven by this midi
  - 44-48 Verse 1 Pad with Auto-Filter w/ Sin LFO, Rate:
        - m63 => 1/12
        - m65 => 1/8
        - m66 => 1/6
        - m67 => 1/3
  - 52.1  Filter bus of 50-52, has 2 filters:
        - Autofiltered lowpass on 8th notes, square LFO, pumped LFO amount midway
        - 2nd half is gated by 52.2 Midi (or automate 1 8th on 3 off)

LINE NOTES:
  0:00 - m01 - I've been playing around with adding an unpitched (sample/spoken) melody here.
  0:00 - m01 - Also was trying to figure out whether it sounds better with the intro bigger, or more a filtered smaller style.  That's why I've included the two variations.
  0:22 - m17 - I've mostly been relying on `25 Dmm Bass` for the bassline, and using `26 Eh Bass` for texture here and there.  I like the sound of `ehh bass`, but it was harder to be consistent with tracking.
  0:25 - m19 - The thing I'm most worried about in this song is feeling like it's rushing.  This first Bass entrance is where I notice it the most often. I've been playing around with changing to 168bpm, but not sure how much that'll screw with fidelity.  If it doesn't feel rushed to you in this first section, it's probably chill, though. fyi bass is ~15ms behind grid.
  0:50 - m37 - Only kept Intro Harmony here to play with delay.
  1:54 - m83 - fyi this is one of the two songs I'm considering making a duet.  So Leads are subject to change.
LYRICS.txt
I provide this file for reference, since it can sometimes give an idea of what the song is about. I usually label verses/choruses, just to make sure we have a common “map” of the song. Here is an excerpt from my Charlatan Days LYRICS.txt:
[key C]

[Intro]
[IV V III vi iii III]
[IV V III vi IV V]

[verse 1]
The fighting’s over,
But I'm not really sure I believe what you said.
My memory’s older,
But I'm tryna recall if there was somethin' I did.
Your silence is killing me softly,
These memories are killing me whole,
I don't think I'll take no more.
You dont need to hide it
I ain't gonna fight it
...
TRACKS
This is the first thing I put together in the session export. It is the most work, and it gets me in the mindspace of the track for writing notes.
Choosing a Proper Channel Format #
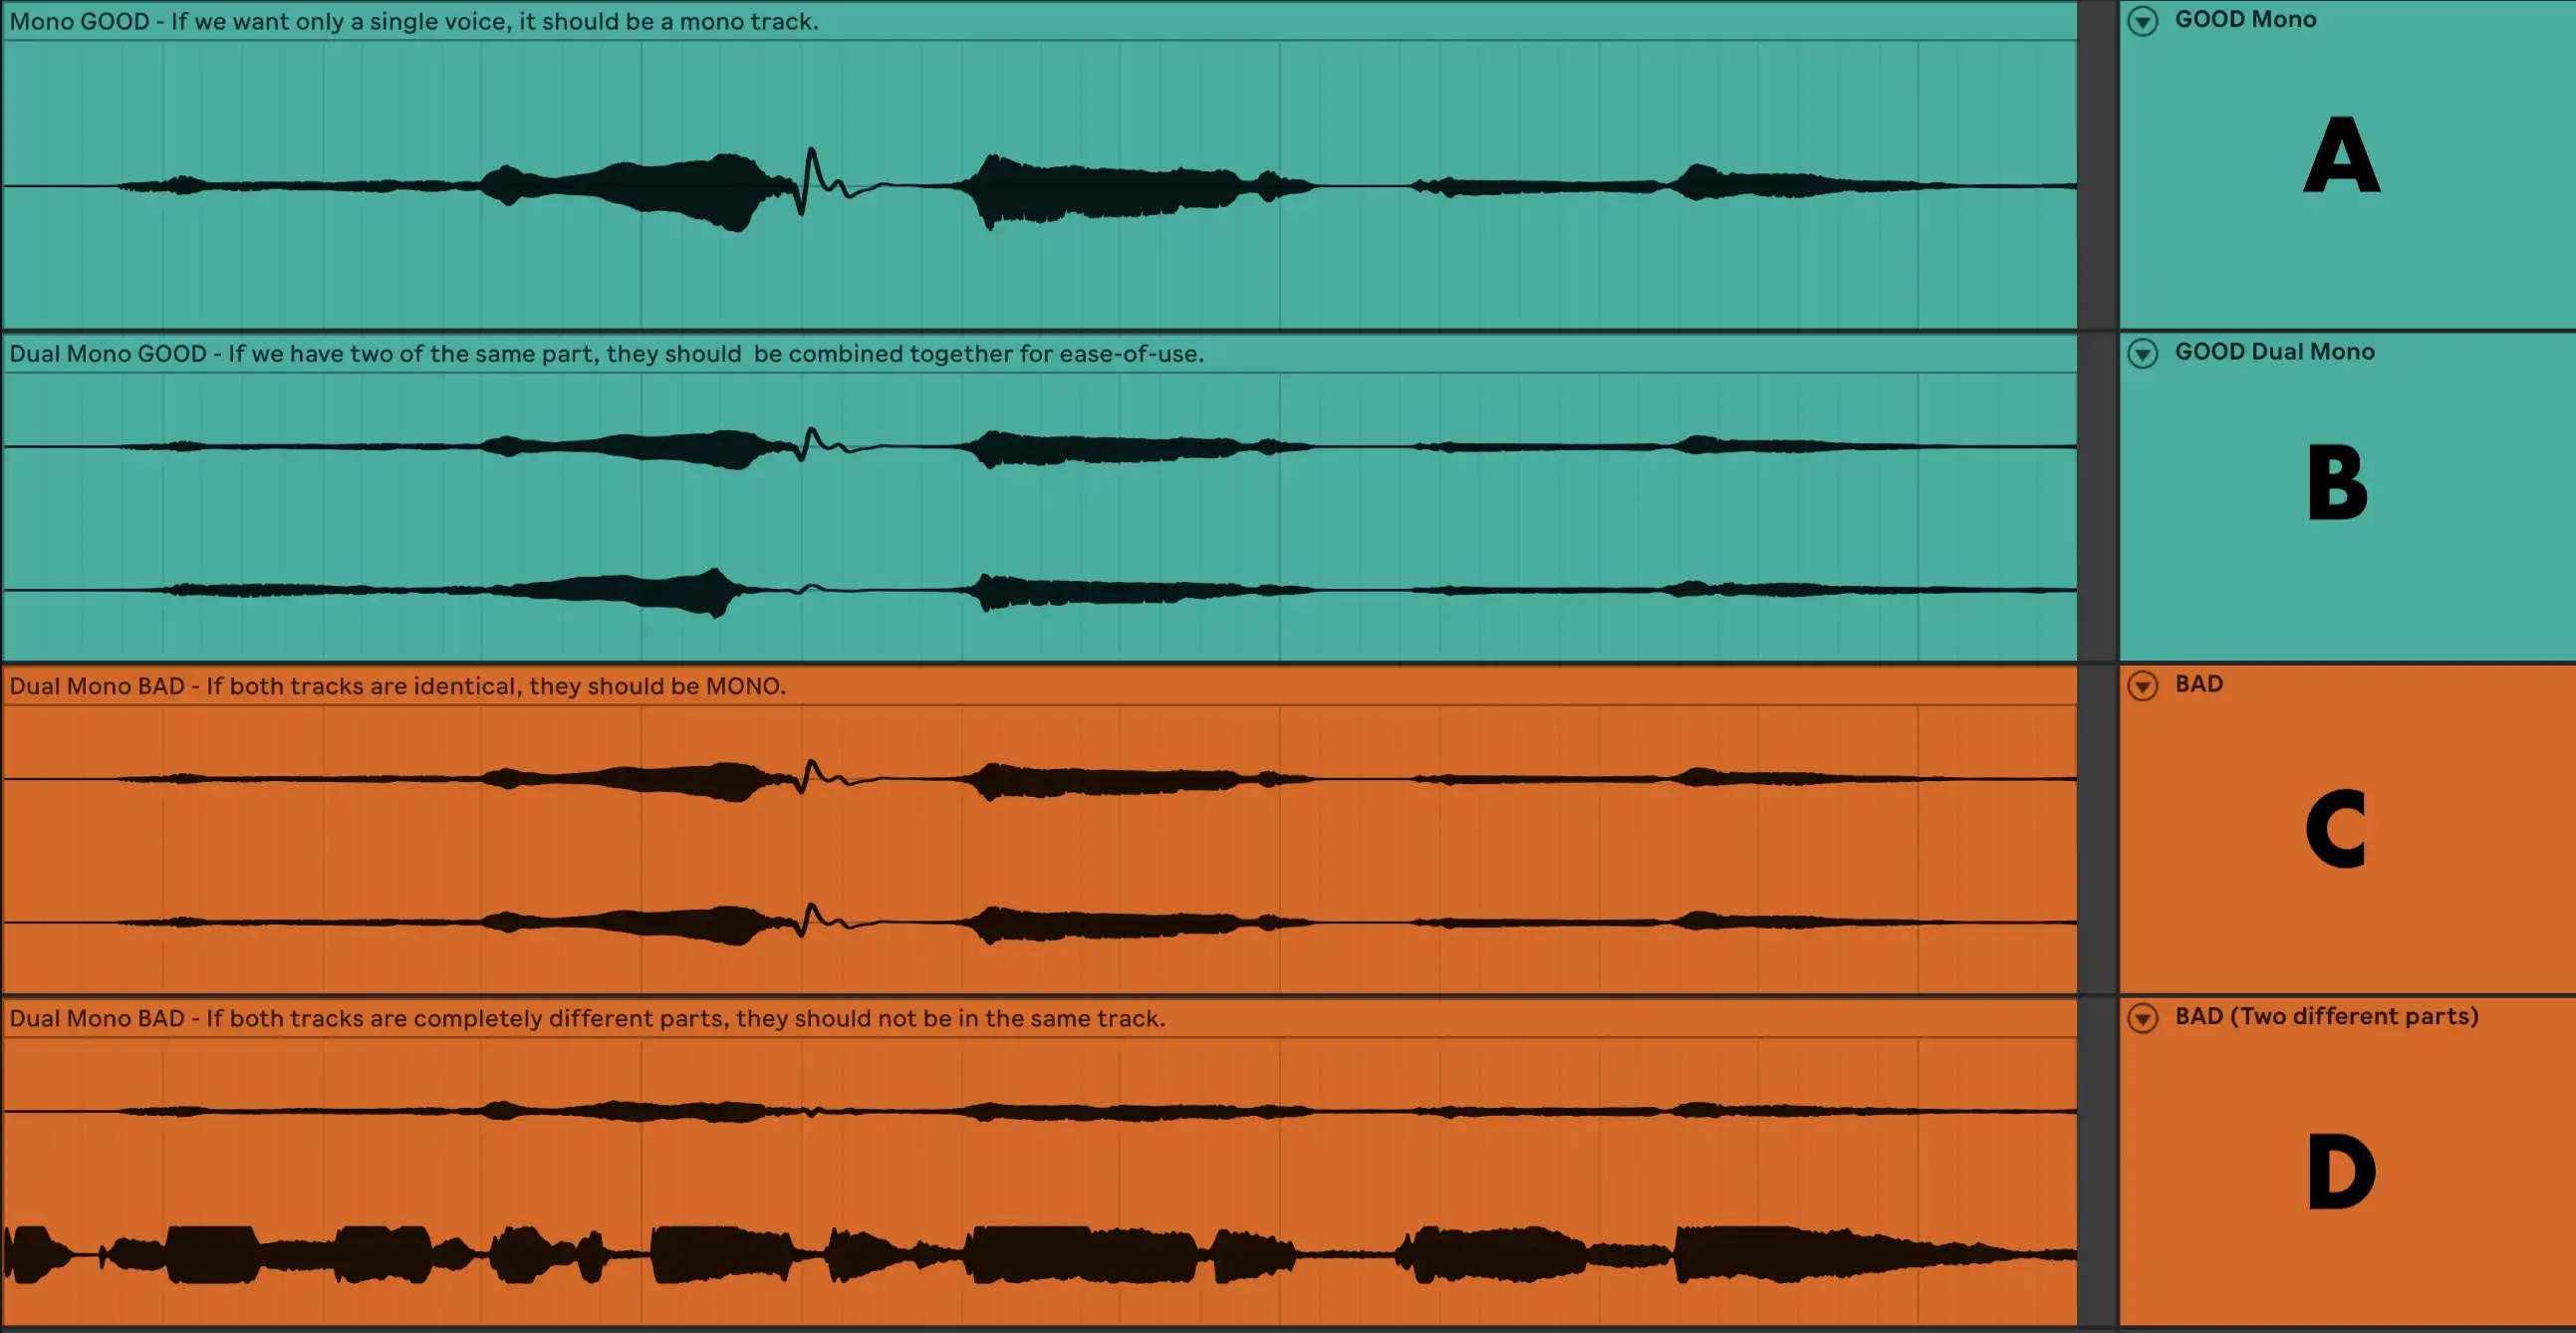
In acappella, ALL of our tracks are recorded in mono. However, we have been recording all of our background vocals twice! This makes our sound much more full, but when we are dealing with upwards of 240 vocal tracks, it becomes much more ergonomical to export these hard-panned mono tracks as dual-mono audio files (stereo .wav files). It is ergonomically better to use stereo stems where possible. Basically it feels better to be mixing 120 Charlatan Days stereo tracks than it does to be mixing 240 hard-panned mono tracks.
| Channel Format | Description |
|---|---|
|
Mono (A) |
This is what we want to use for parts we only have a single voice. Primarily lead and/or deeper bass parts. I also use this if making the track stereo is just not going to add much (ala if I have a lot of parts, or the voice is going to have lots of effects). |
|
Dual Mono (B) |
Most useful for background vocals and some percussion sounds. This is a sound that I recorded twice, in order to sound more full. It is two separate tracks, hardpanned to the left and the right |
|
AVOID Identical Dual Mono (C) |
This is a stereo export with identical left and right channels. Notice this SOUNDS the same as Mono, but it LOOKS like a dual-mono track. So better to avoid this, in order to avoid confusion |
|
AVOID Mismatched Dual Mono (D) |
This is a mistake! There are two different parts here on one track, and this makes it difficult to mix! |
Resampling Mono Tracks into Dual-Mono
<Photo src=“mono-tracked-stereo.PNG” alt= “Dual-Mono Tracks”
I create these in Ableton Live after editing a pair of mono tracks individually:
- Create a new track
- Set the input to “resampled”
- Make sure I don’t have the edited tracks don’t have any buses running
- Then resample it into a stereo track (I also use this moment to double-check the tracks for editing mistakes)
Bouncing Tracks #
Ableton Live has a decent walk-through on exporting stems or parts. Mostly just follow that. I just have a few additional things to pay attention to.
Once I export all the tracks, I usually double-check by just dragging them into another DAW (usually REAPER), and double-checking that it imports the way I expect.
A Note on Bouncing Effects
In the past, I’ve always had an argument with myself about how much ambiguity I want to leave for the mixing engineer. In my head, I had the idea that the mixing engineer is better than I am at mixing, so for instance, if there was a specific effect I wanted, I’d send them the raw track and tell them what I wanted. Looking back, that just creates more opportunities for miscommunication. I now use what is basically a 2-step guideline for deciding whether to apply an effect:
- How much do I care about this effect? Basically, if I have strong conviction that this is an effect I need on this song.
- How much of a pain is it to apply? Am I using a specific plugin?
This also applies to very specific cuts and tails. If I want a long tail on a phrase, I leave it in. If I want to electronically cut-off a phrase, I apply that cut in the exported track as well. Basically, if I KNOW what I want, I should have that applied to the track to avoid unnecessary work.
A good example of this is the intro of Charlatan Days. All the pitch edits and stuttering cuts I applied on those tracks directly. This is a segment from the actual background vocal track I sent to Bill.
When I DO apply an effect during editing, I usually also like to include the raw take in EXTRA_TRACKS. I usually do NOT do this for minor edits, such as cutting off the tail of a phrase electronically on-purpose. I do like to leave a note in my README though, to explain that it is on purpose, though.
Naming and Ordering #
When bouncing stems, we want to name each stem with the track order first. This ensures that when we import the tracks into Bill’s DAW, that all the tracks are in a defined order. We don’t want to waste our engineer’s time moving tracks around!
A basic TRACKS folder might look like this:
TRACKS
	01 Kick.wav
	02 Snare.wav
	03 HiHat.wav
	04 Spit.wav
	05 Fill.wav # Percussion sound that only happens once
	06 Yell A.wav # Another auxillary percussion part
	07 Yell B.wav # Another auxillary percussion part
	08 Bass.wav
	09 Baritone A.wav
	10 Baritone B.wav
	11 Tenor.wav
	12 Alto.wav
	13 Mezzo.wav
	14 Soprano.wav
	15 Woo A.wav # Auxillary vocal part (not part of main arrangement)
	16 Woo B.wav # Another auxillary vocal part
Since I didn’t through-arrange these songs on paper, I don’t really have traditional singing parts (Soprano, Alto, Tenor, Bass, etc). Instead, I split up my session into “instruments”. Since I end with more tracks due to all of these instruments, I tend to name and order tracks a little differently.
A more typical VX1 TRACKS ordering looks like this:
TRACKS
	01 SubKick # Mono Track, processed version of 02 Kick.wav
	02 Kick.wav # Mono track
	03 Snare.wav # Compiled Stereo track
	04 HiHat.wav # Compiled Stereo track
	05 Spit.wav # Compiled Stereo track (depending on song, maybe mono)
	06 Bass 8vb.wav # Mono track, separate from `07 Bass`, pitched down
	07 Bass.wav # Compiled Stereo track
	08 Lead.wav # Mono track
	09 Rhythm Pad A.wav # Compiled Stereo track, Lowest voice
	10 Rhythm Pad B.wav # Compiled Stereo track, Middle voice
	11 Rhythm Pad C.wav # Compiled Stereo track, Highest voice
	12 Outro Harmony A.wav # Comes later in song,
	13 Outro Harmony B.wav # so it is ordered later
	14 Outro Harmony C.wav
	15 Outro Harmony D.wav

EXTRA_TRACKS
  06.01 Bass 8vb RAW.wav # Mono track without pitch editing
	09.01 Rhythm Pad A RAW.wav # Numbered to slot in between "11" and "12"
	09.02 Rhythm Pad B RAW.wav
	09.03 Rhythm Pad B RAW.wav
Clear Names are Clear Intentions
Try to make the names of the tracks as clear as possible!
I think the best way to describe this is my experience with the S.U.S. “castanets”. I had a kind of white-noise sound I was using rhythmically in S.U.S. They kind of filled the role of castanets in the drumset just by the kind of rhythm. So I named them “castanets”. When Bill sent me back the first mix for that song, suddenly the sound actually sounded like a castanet! Bill had interpreted my naming to mean that I was looking for a castanet sound, and added a small effect to emphasize that sound a bit more! So you want to be a bit wary of what a first time listener will interpret your naming to mean.
My Export Checklist
I double-check this list for each session before pressing send:
- [ ] **TRACKS**
  - [ ] 1 Measure of rest before entrance
  - [ ] All tracks are .wav files
  - [ ] Mono tracks are mono (No stereo tracks with identical L/R channels)
  - [ ] Stereo tracks are stereo (All L/R named tracks are consolidated into stereo tracks)
  - [ ] Nothing is downsampled (My tracking was done in 24-bit/48k sample rate)
  - [ ] All tracks are numbered and in order:
    - Main Percussion Set
      - Kick Drum
      - Snare
      - High Hats
      - Tom
      - Cymbal crashes/rides
      - Spit Take
      - Auxiliary percussion (hand claps, shakers, etc.)
      - Bass Vocals
      - Vocals
        - Grouped however makes sense (Usually by entrance or pitch)
        - Lowest vocal part of each group is first
- [ ] **README.txt**
  - [ ] Tempo at top any tempo changes are explained with measure number + time
  - [ ] All liner notes reference the reference track by measure number + time
  - [ ] README is copypasta'd into the email text w/ the session upload link
- [ ] **REFERENCE.wav**
  - [ ] Starts at same time as the session
Press Send! #
Uploading Files
Usually, I package all these files into a .zip file, and upload it to my personal server to send it (the file is much too big for an email). I haven’t explored the alternative all too much, but probably your mixing engineer has an opinion about how to get the files to them. Bill usually uses wetransfer, and mentions Dropbox and some other alternatives on his FAQ (ftp, fedex, carrier pigeon, etc).
The e-mail
Then I pop a link to the uploaded files into an email. I also usually copypasta my README.txt into the email, just for ease-of-access, if you want to keep all the mixes and feedback in an e-mail thread.
Once it’s all sent, we’re off to Mixing and Mastering!